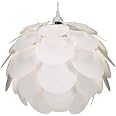
kwmobile Puzzle Pendant Lamp Shade - Lotus Flower DIY Jigsaw Lampshade Kit - for Hanging Ceiling Light or Floor Lamp - Diameter 20" (50cm) - White
Details
- Brandkwmobile
- ColorWhite
- MaterialPlastic
- ShapeRound
- Special FeatureCan be used as
- Product Dimensions12.4"W x 1.2"H

Description
🧩 Light Up Your Creativity with Every Piece!
- VERSATILE LIGHTING FOR EVERY MOOD - Use as a pendant chandelier or pair with floor/table lamps for flexible, stylish illumination.
- AFFORDABLE LUXURY LIGHTING UPGRADE - Get premium quality and design without the premium price tag of traditional lampshades.
- EFFORTLESS ELEGANCE NO TOOLS NEEDED - Snap together 50 translucent polypropylene petals for a sleek, layered centerpiece without hassle.
- NEUTRAL WHITE INFINITE STYLE MATCHES - Seamlessly blends with modern, industrial, or classic interiors—perfect for bedrooms, kitchens, or hallways.
- TRANSFORM YOUR SPACE WITH DIY ART DECO - Assemble a stunning 20-inch lotus flower lampshade that elevates any room’s vibe.
The kwmobile Puzzle Pendant Lamp Shade is a 50-piece DIY lampshade kit featuring a modern lotus flower design made from durable translucent polypropylene. Measuring 20 inches in diameter, it supports up to 40W LED bulbs and can be used as a pendant or with floor/table lamps. Easy to assemble without tools, it offers a stylish, affordable lighting solution that complements a variety of interior styles.


Specifications
| Brand | kwmobile |
| Color | White |
| Material | Plastic |
| Shape | Round |
| Special Feature | Can be used as a pendant, or with a floor or table lamp, Versatile arrangements |
| Product Dimensions | 12.4"W x 1.2"H |
| Finish Type | Unfinished |
| Style | Modern |
| Mounting Type | Pendant |
| Pattern | Floral |
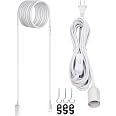
| Included Components | Lampshade kit with 50 pieces, assembly instructions |
| Item Weight | 406 Grams |
| Number of Pieces | 50 |
| Top Width | 20 Inches |
| Base Width | 4.5 Inches |
| Assembly Required | Yes |
| Manufacturer | KW-Commerce |
| Part Number | 38946 |
| Item Weight | 14.3 ounces |
| Country of Origin | China |
| Item model number | 38946_m000096 |
| Is Discontinued By Manufacturer | No |
| Finish types | Unfinished |
| Number of Lights | 1 |
| Maximum Compatible Wattage | 40 Watts |
| Voltage | 100 Volts |
| Specific Uses | Lamp shade |
| Special Features | Can be used as a pendant, or with a floor or table lamp, Versatile arrangements |
| Shade Material | Polypropylene |
| Light Direction | Pendant or torchiere |
| Plug Format | A- US style |
| Power Source | No power source |
| Batteries Included? | No |
| Batteries Required? | No |
| Type of Bulb | LED |
| Luminous Flux | 470 Lumen |
| Wattage | 40 watts |
| Wattage | 40 Watts |
Reviews
L**A
Absolutely love the results!
I absolutely love these! I ordered extenders so that I could cover bare bulbs. They are fabulous!!They do take a little patience to put together, however you can’t beat the price!
S**H
Very pleased
These shades were easy to put together and they look awesome!
M**R
LOVE, LOVE, LOVE!
The media could not be loaded. I absolutely LOVE this shade! I purchased two, so I could plan an art projects day with my bf. It turned out that she enjoyed watching me put together...... hers. 😂 They turned out to be absolutely beautiful. The directions are minimal, so I will share how I put ours together. After you get the main tube connected (it's pretty easy), and the ring, that goes over the light socket, you want to find the smallest petal pieces (all petal pieces are numbered 1 - 5, with 1 being the smallest, and 5 being the largest) and start securing them into the slots at the bottom of the tube (opposite end of where the light socket ring). The petal pieces from bottom to top, go in the sequence of 1 - 2 - 3 - 4 - 5 - 4. You'll need a light socket ring to secure the shade before installing a bulb. I recommend a color changing bulb, as it enhances the beauty of the shade.
R**E
Cute once you build it
I'll add pictures later because I'm on mobile and having to hunt them down and all that after I've taken a billion others is not fun so maybe I'll post it later but I like the lamps!One important thing to note that I didn't realize when I made my purchase was that these do not come with the pendant light kit to plug it in and hang it with. I had looked at several other ones before and like another variant of this that was a single but I think that one actually came with the pieces and this one does not have the actual cord that has the bulb spot and plug. You'll need to buy that separately. It didn't really specify in the picture was a bit misleading because like the default picture on this page was the bulb with the cord so I thought it was the complete set but I eventually figured that part out and got a two pack of 15 footers.They're a lot larger than I was expecting but it's a good size that's what I was hoping for I just couldn't picture it in my head.It's a completely DIY assemble yourself which I didn't realize either because I was in a hurry and I was just scrolling through dozens upon dozens of tabs that I had open options.Basically there's a long sheet of plastic and in the instructions, it's funny they say you "might" have to poke out the little cut outs on the page... well jokes on you because you will literally have to poke out every single one of the like 55 or 60 holes on the plastic because the machine that cuts it doesn't seem also remove it. They made it sound like there might be a few but it's literally every single one LOL so do that twice.Then you have to fold that flat large sheet of plastic into a round tube shape and lock it together, imagine like those foam gym floor mats that interlock like puzzle pieces. Each side is basically that and you have to force it to lock together because it's a little bit tight so that's interesting.But that's not the best part. At some point you have to open and crease all the petals I just did this as I went each row at a time and the first two rows are easier to insert. Think of this part of it like one of those pegboard walls that you hang tools on and you put the different pegs and metal hooks into the slots, each pedal has two tabs, and you shove it into the little holes and you go around and you keep doing that on all the sides.If you start from the smallest to the biggest like the directions recommend the first two rows are the easiest but as you get further back it gets trickier because the petals get bigger so they they can be difficult to grasp and then you're going further back on the plastic tube which is only supported at one end by where the bulb goes in that little bridge that goes between it so the plastic becomes flimsy and you've got a stick your hand in through one under the other to support it so you can put the pegs in.I hope I'm not deterring you lol, but my first one I was a little bit confused and I felt like it should go the other way and I should have done it that way but there's no way I'm undoing this and going backwards so it is what it is LOL. I followed what the directions said.When it's completed according to the directions the lotus flower seems to be facing upward like if you were literally holding a flower by the stem like you were handing it to somebody but because mine was going to be over my head I would have preferred the petals going from largest to smallest going downward like I'm looking up into a flower but I assembled it as instructed and it doesn't really sit well if you try to put the bulb the other direction, way because it just shifts, so for me I wish I would have assembled it the other way.Overall once I did the first one I got halfway through, you get the process down. it's easy to do the second one it took me about 30 minutes to do each one I was laying in bed taking my time cuz I honestly wasn't in any hurry. these were going to the office with me.The end result is super cute and for the price it's worth the DIY. I purchased some refurbed RGB LED light bulbs on Amazon for $14 for a two pack which is pretty good and it has an app that I can control the color and the lighting intensity, and I also because I'm extra and didn't want to have to deal with having to log into a nap on my phone every time to turn it on and off when I'm leaving bought some smart plugs that have an RF remote so I can just power it on and off from my desk with a remote and things are great! The spark plug I got came in a pack of three with one outlet on each and a remote that can on off three different devices and since I share an office with three people and they each also got their own variety of lamp all three of us now have our lamps on the switch and can turn them on and off with the remote easily so last one out could just hit off off off and go.Once I take pictures of them assembled in the office I'll post done up. I'm not done decorating lol
D**Y
Love
Hard to get the plastic base cylinder together, but they look fantastic.
T**Y
XLed it
Doubled the size and cut out a new base. Slightly crooked but I just need to adjust the base.
S**.
Pretty and functional.
Easy to put together. Looks great in either position. Adds a beautiful "chandelier" in the room.
S**R
Love Pinterest upcycle posts but, suck at crafts? This isn't recycled (is it?) but, it's for you!
Many, many, moons ago, I had a dream of making a Pinterest-esque lampshade out of a bunch of empty water jugs. Well, friends, after a few failed attempts, that dream fell off the priority ladder only to be realized in another form. This form.The directions were easy to follow. It took a few tries to get the column to fold into (and under) itself but, once done, it has not come apart again and I have tested it rigorously. I meant to use this with a standing/floor lamp but, unfortunately it didn't quite fit the old base.Undaunted, I decided to see if I could use it to dress up a ceiling lamp instead. My old light fixture screwed into the fan base at three points so, I just (carefully!) punched holes for the screws into the lampshade cylinder at the 3 support points (see photo close up). The shade took a lot of abuse as I adjusted it to fit the base. Some pieces fell out during all that but, went right back in. The ceiling fan has been on for a few hours and the cylinder shade base is warm but, not hot. Getting the bulb to sit exactly in the center is a must because if it is too close to a side, it can get pretty hot.I think this is probably better as a floor lamp shade, simply because from beneath the shade it is easy to see the cylinder and all the puzzle pieces stuck inside. That looks a little cheap to me. Otherwise, this shade is really neat and the symmetrical design is great for calming the mind after all those crafting failures.
Common Questions
Trustpilot
2 days ago
2 months ago
